


Python培训
400-996-5531
本文介绍用在Windows下把C/C++的函数(这类函数通常执行复杂的运算)编译后封装成Python的库,并用Python调用。C的函数主要实现使用GPU加速运算。
(1)创建VS项目
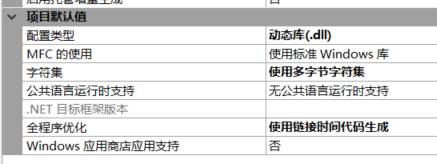
设置项目的属性为DLL动态库:
(2)写C代码
C代码基本结构:
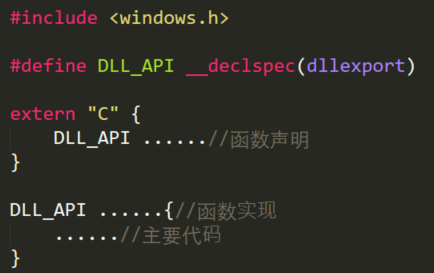
然后将项目生成解决方案,得到*.dll文件。(源代码见文末)
(3)在Python库的路径下新建一个文件夹,作为库的名字,如:
E:\Anaconda3\Lib\site-packages\cuda。注意不要和标准的库名冲突,建议取成:C_*的形式。
找到之前生成的*.dll文件(这里是cuda.dll),放入上述文件夹内。
(4)新建一个__init__.py文件
代码如下:
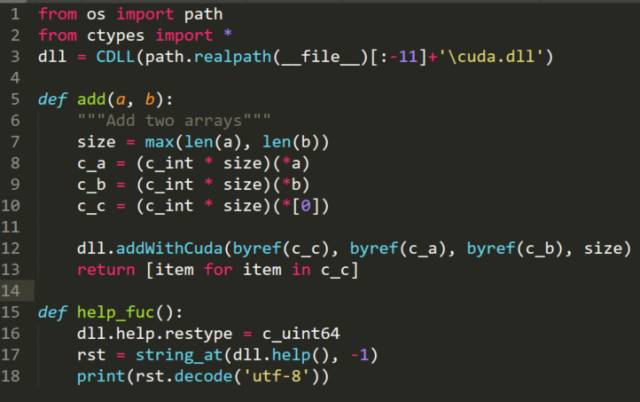
载入dll的方法:用ctypes.CDLL('filepath')。
其中,cuda.add函数是把两个数组相加(当然Python里没有数组的概念,传入的是列表),调用的是C中的addWithCuda这个函数。而addWithCuda这个函数的参数分别是:目标数组、相加的两个数组、数组长度。在Python调用时,需要生成C格式的数组,如c_a。
cuda.help_fuc是调用C中的help函数,而help函数是解释addWithCuda这个函数的,在C中返回的是一个字符串,而在Python中,也需要将其格式化。由于兼容性问题(可能是Python3.*的一个小BUG),还需用
dll.help.restype = c_uint64
语句把help函数的返回值变成64位无符号整数。最后,Python把获得的64位无符号整数转为utf-8格式的字符串。
这样一个库就封装完毕,可以用Python调用cuda这个库中的函数了。
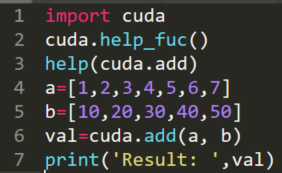
(5)调用函数
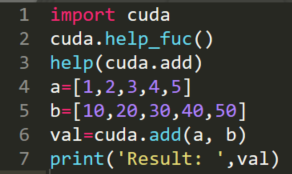
运行结果:
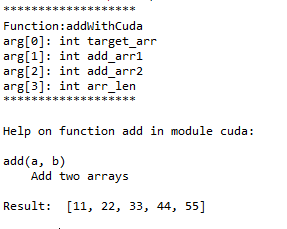
其中,help(cuda.add)是返回了__init.py__中add函数的说明。
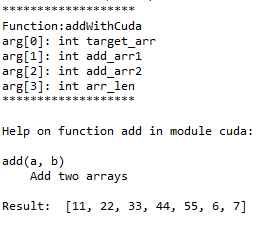
在实际使用时,如果输入的列表长度不相同,则会自动用0来补充:
源代码
1.cuda.cu
#include <windows.h>
#define DLL_API __declspec(dllexport)
#include "cuda_runtime.h"
#include "device_launch_parameters.h"
#include <stdio.h>
extern "C" {
DLL_API cudaError_t addWithCuda(int *c, const int *a, const int *b, unsigned int size);
DLL_API char * help(void);
}
DLL_API char * help(void) {
return "*******************\n\
Function:addWithCuda\n\
arg[0]: int target_arr\n\
arg[1]: int add_arr1\n\
arg[2]: int add_arr2\n\
arg[3]: int arr_len\n\
*******************\n";
}
__global__ void addKernel(int *c, const int *a, const int *b){
int i = threadIdx.x;
c[i] = a[i] + b[i];
}
cudaError_t addWithCuda(int *c, const int *a, const int *b, unsigned int size){
int *dev_a = 0;
int *dev_b = 0;
int *dev_c = 0;
cudaError_t cudaStatus;
cudaStatus = cudaSetDevice(0);
if (cudaStatus != cudaSuccess) {
fprintf(stderr, "cudaSetDevice failed! Do you have a CUDA-capable GPU installed?");
goto Error;
}
cudaStatus = cudaMalloc((void**)&dev_c, size * sizeof(int));
if (cudaStatus != cudaSuccess) {
fprintf(stderr, "cudaMalloc failed!");
goto Error;
}
cudaStatus = cudaMalloc((void**)&dev_a, size * sizeof(int));
if (cudaStatus != cudaSuccess) {
fprintf(stderr, "cudaMalloc failed!");
goto Error;
}
cudaStatus = cudaMalloc((void**)&dev_b, size * sizeof(int));
if (cudaStatus != cudaSuccess) {
fprintf(stderr, "cudaMalloc failed!");
goto Error;
}
cudaStatus = cudaMemcpy(dev_a, a, size * sizeof(int), cudaMemcpyHostToDevice);
if (cudaStatus != cudaSuccess) {
fprintf(stderr, "cudaMemcpy failed!");
goto Error;
}
cudaStatus = cudaMemcpy(dev_b, b, size * sizeof(int), cudaMemcpyHostToDevice);
if (cudaStatus != cudaSuccess) {
fprintf(stderr, "cudaMemcpy failed!");
goto Error;
}
addKernel<<<1, size>>>(dev_c, dev_a, dev_b);
cudaStatus = cudaGetLastError();
if (cudaStatus != cudaSuccess) {
fprintf(stderr, "addKernel launch failed: %s\n", cudaGetErrorString(cudaStatus));
goto Error;
}
cudaStatus = cudaDeviceSynchronize();
if (cudaStatus != cudaSuccess) {
fprintf(stderr, "cudaDeviceSynchronize returned error code %d after launching addKernel!\n", cudaStatus);
goto Error;
}
cudaStatus = cudaMemcpy(c, dev_c, size * sizeof(int), cudaMemcpyDeviceToHost);
if (cudaStatus != cudaSuccess) {
fprintf(stderr, "cudaMemcpy failed!");
goto Error;
}
Error:
cudaFree(dev_c);
cudaFree(dev_a);
cudaFree(dev_b);
return cudaStatus;
}
2.__init__.py
from os import path
from ctypes import *
dll = CDLL(path.realpath(__file__)[:-11]+'\cuda.dll')
def add(a, b):
"""Add two arrays"""
size = max(len(a), len(b))
c_a = (c_int * size)(*a)
c_b = (c_int * size)(*b)
c_c = (c_int * size)(*[0])
dll.addWithCuda(byref(c_c), byref(c_a), byref(c_b), size)
return [item for item in c_c]
def help_fuc():
dll.help.restype = c_uint64
rst = string_at(dll.help(), -1)
print(rst.decode('utf-8'))
3.mian.py
import cuda
cuda.help_fuc()
help(cuda.add)
a=[1,2,3,4,5]
b=[10,20,30,40,50]
val=cuda.add(a, b)
print('Result: ',val)
本文内容转载自网络,本着分享与传播的原则,版权归原作者所有,如有侵权请联系我们进行删除!
填写下面表单即可预约申请免费试听! 怕学不会?助教全程陪读,随时解惑!担心就业?一地学习,可全国推荐就业!
Copyright © Tedu.cn All Rights Reserved 京ICP备08000853号-56  京公网安备 11010802029508号 达内时代科技集团有限公司 版权所有